1. 前言
java.util.concurrent包提供了若干便于并发编程的工具,包括:
- 线程池(ThreadPoolExecutor)
- 并发容器(ConcurrentHashMap)
- Fork/Join框架
- 各种阻塞队列(ArrayBlockingQueue, LinkedBlockingQueue).
本文将基于jdk1.8.0_66来分析ThreadPoolExecutor的实现,希望通过我自己画的一些图,能够简明易了的讲解ThreadPoolExecutor的源码.
本文接下来的组织如下:首先演示了ThreadPoolExecutor的使用(见本文第2节);然后给出了ThreadPoolExecutor以及ScheduledThreadPoolExecutor的整体架构(见本文第3节);在第4节中详细分析ThreadPoolExecutor的实现,这也是本文的重点;最后,在第5节中进行了简单的总结.
2. ThreadPoolExecutor使用示例
ThreadPoolExecutor的使用并不是本文的重点,所以借这里的例子来演示.
首先,用户将自己的任务抽象成Task,实现Runnable接口.例如,在下面的代码中,WorkerThread实现了Runnable接口,用户的业务逻辑在processCommand中实现,使用线程池时,线程池里的线程调用run方法,run方法调用用户的processCommand方法,这也是写代码的惯用方式.
package com.journaldev.threadpool;

public class WorkerThread implements Runnable {

    private String command;

    public WorkerThread(String s){
        this.command=s;
    }

    @Override
    public void run() {
        System.out.println(Thread.currentThread().getName()+" Start. Command = "+command);
        processCommand();
        System.out.println(Thread.currentThread().getName()+" End.");
    }

    private void processCommand() {
        try {
            Thread.sleep(5000);
        } catch (InterruptedException e) {
            e.printStackTrace();
        }
    }

    @Override
    public String toString(){
        return this.command;
    }
}
使用线程池执行任务时,先定义一个ExecutorService,然后通过Executors提供的Factory函数(静态成员函数)来初始化一个线程池,然后将任务丢给线程池即可.如下所示:
package com.journaldev.threadpool;

import java.util.concurrent.ExecutorService;
import java.util.concurrent.Executors;

public class SimpleThreadPool {

    public static void main(String[] args) {
        ExecutorService executor = Executors.newFixedThreadPool(5);
        for (int i = 0; i < 10; i++) {
            Runnable worker = new WorkerThread("" + i);
            executor.execute(worker);
          }
        executor.shutdown();
        while (!executor.isTerminated()) {
        }
        System.out.println("Finished all threads");
    }

}
上面的例子非常简单,在生产环境中,会稍微复杂一点.生产环境中一般不会直接调用ExecutorService的execute方法,而是定义好ExecutorService以后,直接通过submit方法将Task丢给ExecutorService.
// 声明
public static ExecutorService executorService;

// 定义
executorService = Executors.newFixedThreadPool(nThreads);
......

// 使用
executorService.submit(thread);
注意:submit在实现时,也是调用execute来执行Task的,不过Submit会返回给用户一个Future对象,用户可以通过这个Future对象知道任务的状态.
public <T> Future<T> submit(Callable<T> task) {
    if (task == null) throw new NullPointerException();
    RunnableFuture<T> ftask = newTaskFor(task);
    execute(ftask);
    return ftask;
}
3. ExecutorService的整体架构图
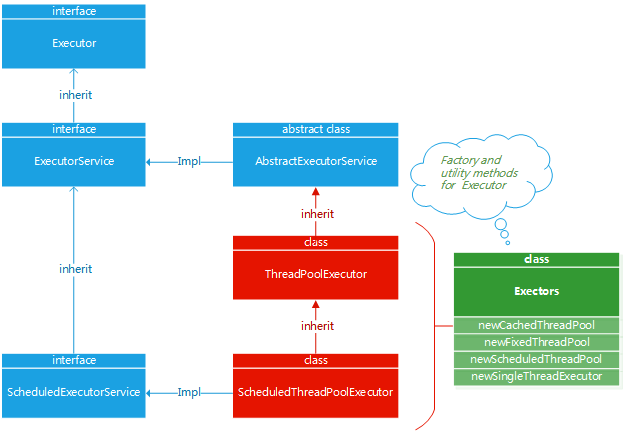
刚开始接触ExecutorService的同学,肯定有过短暂的困惑。Executor、Executors、ExecutorService、ThreadPoolExecutor、ScheduledExecutorService,ScheduledThreadPoolExecutor这些东西纠缠在一起,根本不知道怎么用.如果我们理解了它们之间的关系,使用起来就会容易得多,为此,我画了一张关系图,如下所示:

从图中可以看到Executor、ExecutorService、ScheduledExecutorService是接口,ThreadPoolExecutor和ScheduledThreadPoolExecutor是线程池实现,前者是一个普通的线程池,后者一个定期调度的线程池,Executors是辅助工具,用以帮助我们定义线程池.
Executors中用于生成线程池的几个Factory函数如下:
- newCachedThreadPool
- newFixedThreadPool
- newSingleThreadExecutor
- newScheduledThreadPool
- newSingleThreadScheduledExecutor
我们看一下newFixedThreadPool函数的定义,如下所示:
public static ExecutorService newFixedThreadPool(int nThreads) {
    return new ThreadPoolExecutor(nThreads, nThreads,
                                  0L, TimeUnit.MILLISECONDS,
                                  new LinkedBlockingQueue<Runnable>());
}
可以看到,newFixedThreadPool帮我们定义了一个ThreadPoolExecutor对象.Executors的存在,就是为了简化线程池的创建,帮助我们使用.
这里再强调一下java.util.concurrent中与线程池相关的各个类和接口之间的关系.Executor、ExecutorService、ScheduledExecutorService是接口,ThreadPoolExecutor和ScheduledThreadPoolExecutor是线程池实现,Executors是辅助工具,用以帮助我们定义线程池.对于想要了解Java线程池的同学,只需要通过这张图理解各个成员之间的关系,然后将注意力集中到ThreadPoolExecutor,深入学习ThreadPoolExecutor即可(在本文中,我们不讨论ScheduledExecutorService和ScheduledThreadPoolExecutor).
4. ThreadPoolExecutor的实现
我们从ThreadPoolExecutor的构造函数开始了解 ThreadPoolExecutor的实现,ThreadPoolExecutor有多个构造函数,我们看参数最完整的一个.如下所示:
/**
 * Creates a new {@code ThreadPoolExecutor} with the given initial
 * parameters.
 *
 * @param corePoolSize the number of threads to keep in the pool, even
 *        if they are idle, unless {@code allowCoreThreadTimeOut} is set
 * @param maximumPoolSize the maximum number of threads to allow in the
 *        pool
 * @param keepAliveTime when the number of threads is greater than
 *        the core, this is the maximum time that excess idle threads
 *        will wait for new tasks before terminating.
 * @param unit the time unit for the {@code keepAliveTime} argument
 * @param workQueue the queue to use for holding tasks before they are
 *        executed.  This queue will hold only the {@code Runnable}
 *        tasks submitted by the {@code execute} method.
 * @param threadFactory the factory to use when the executor
 *        creates a new thread
 * @param handler the handler to use when execution is blocked
 *        because the thread bounds and queue capacities are reached
 * @throws IllegalArgumentException if one of the following holds:<br>
 *         {@code corePoolSize < 0}<br>
 *         {@code keepAliveTime < 0}<br>
 *         {@code maximumPoolSize <= 0}<br>
 *         {@code maximumPoolSize < corePoolSize}
 * @throws NullPointerException if {@code workQueue}
 *         or {@code threadFactory} or {@code handler} is null
 */
public ThreadPoolExecutor(int corePoolSize,
                          int maximumPoolSize,
                          long keepAliveTime,
                          TimeUnit unit,
                          BlockingQueue<Runnable> workQueue,
                          ThreadFactory threadFactory,
                          RejectedExecutionHandler handler) {
    if (corePoolSize < 0 ||
        maximumPoolSize <= 0 ||
        maximumPoolSize < corePoolSize ||
        keepAliveTime < 0)
        throw new IllegalArgumentException();
    if (workQueue == null || threadFactory == null || handler == null)
        throw new NullPointerException();
    this.corePoolSize = corePoolSize;
    this.maximumPoolSize = maximumPoolSize;
    this.workQueue = workQueue;
    this.keepAliveTime = unit.toNanos(keepAliveTime);
    this.threadFactory = threadFactory;
    this.handler = handler;
}
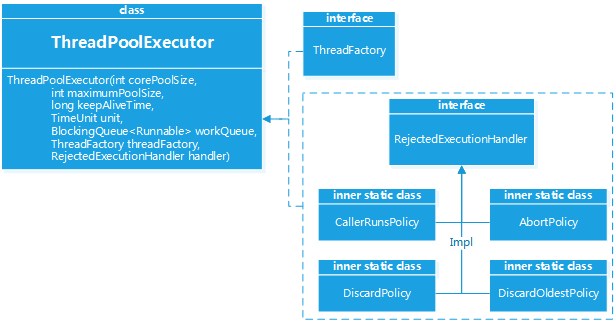
仔细看上面的注释,就能理解各个参数的含义,这里特别说明一下RejectedExecutionHandler,这个handler定义了当所有线程都处于busy状态,且工作队列满时,如何处理新到达的任务.
有以下几种处理方式:
- CallerRunsPolicy:如果发现线程池还在运行,就直接运行这个线程,由用户线程执行而不是由线程池执行
- DiscardOldestPolicy:在线程池的等待队列中,将头取出一个抛弃,然后将当前线程放进去.
- DiscardPolicy:直接抛弃任务
- AbortPolicy(默认):抛出一个RejectedExecutionException异常
下图所示:

在第一节中我们说过,无论是直接调用execute还是通过submit提交任务,最后都是执行execute函数,因此,我们将目光聚集到execute函数上:
public void execute(Runnable command) {
    if (command == null)
        throw new NullPointerException();
    /*
     * Proceed in 3 steps:
     *
     * 1. If fewer than corePoolSize threads are running, try to
     * start a new thread with the given command as its first
     * task.  The call to addWorker atomically checks runState and
     * workerCount, and so prevents false alarms that would add
     * threads when it shouldn't, by returning false.
     *
     * 2. If a task can be successfully queued, then we still need
     * to double-check whether we should have added a thread
     * (because existing ones died since last checking) or that
     * the pool shut down since entry into this method. So we
     * recheck state and if necessary roll back the enqueuing if
     * stopped, or start a new thread if there are none.
     *
     * 3. If we cannot queue task, then we try to add a new
     * thread.  If it fails, we know we are shut down or saturated
     * and so reject the task.
     */
    int c = ctl.get();
    if (workerCountOf(c) < corePoolSize) {
        if (addWorker(command, true))
            return;
        c = ctl.get();
    }
    if (isRunning(c) && workQueue.offer(command)) {
        int recheck = ctl.get();
        if (! isRunning(recheck) && remove(command))
            reject(command);
        else if (workerCountOf(recheck) == 0)
            addWorker(null, false);
    }
    else if (!addWorker(command, false))
        reject(command);
}
我们假设现在的线程池中,线程的数量还没有达到corePoolSize,那么, ThreadPoolExecutor将会新建一个线程来处理当前的任务.这个逻辑是在addWorker中完成的.这里再多说一句,addWorker通过判断线程池中线程的数量是否达到corePoolSize来判断是否需要新建一个Worker,这个简单的逻辑就实现了线程池的线程的增长逻辑.下面来看addWorker的代码:
private boolean addWorker(Runnable firstTask, boolean core) {

    Worker w = null;
    w = new Worker(firstTask);

    final Thread t = w.thread;
    if (t != null) {
        workers.add(w);
        t.start();
    }
删除了无数代码,只保留了我们关心的几行,在addWorker中,会new一个Worker,然后启动线程.显然,这里实现了新增一个线程的逻辑.至于线程是怎么创建的,跟随我一起来看Worker的构造函数:
private final class Worker
       extends AbstractQueuedSynchronizer
       implements Runnable
   {
       final Thread thread;
       Runnable firstTask;
       volatile long completedTasks;

       Worker(Runnable firstTask) {
           this.firstTask = firstTask;
           this.thread = getThreadFactory().newThread(this);
       }

       /** Delegates main run loop to outer runWorker  */
       public void run() {
           runWorker(this);
       }
Worker的实现是ThreadPoolExecutor代码的重点,实现也很巧妙.可以看到Worker自身也实现了Runnable接口,实现了run方法,在Worker的构造函数中,通过用户传入的ThreadFactory新建了一个线程.这里特别注意传给线程的参数是this,也就是说,新建的线程最后调用的是Worker的run方法.而Worker的run方法调用的是外部的runWorker(this).
我们来看一下runWorker的实现:
final void runWorker(Worker w) {
    Thread wt = Thread.currentThread();
    Runnable task = w.firstTask;
    w.firstTask = null;
    w.unlock(); // allow interrupts
    boolean completedAbruptly = true;
    try {
        while (task != null || (task = getTask()) != null) { //如果getTask()返回null,线程退出
            w.lock();

           try {
                beforeExecute(wt, task); //用户可以定义执行前的操作
                Throwable thrown = null;
                try {
                    task.run(); //执行用户的业务逻辑
                } catch (RuntimeException x) {
                    thrown = x; throw x;
                } catch (Error x) {
                    thrown = x; throw x;
                } catch (Throwable x) {
                    thrown = x; throw new Error(x);
                } finally {
                    afterExecute(task, thrown); //用户可以定义执行后的清理操作
                }
            } finally {
                task = null;
                w.completedTasks++;
                w.unlock();
            }

        }
        completedAbruptly = false;
    } finally {
        processWorkerExit(w, completedAbruptly);
    }
}
runWorker通过getTask获取任务,得到任务以后,就执行任务,任务执行完毕以后,获取下一个任务.
现在让我们停下来理一理,用户将自己的任务抽象为Task,Task实现了Runnable接口,然后将Task通过submit放入到工作队列.ThreadPoolExecutor中一个worker就表示一个线程,线程自身调用Worker的run方法,Worker的run方法调用的是runWorker函数,runWorker不断地从工作队列中获取任务,然后通过task.run()执行用户的代码.示意图如下:

getTask的代码如下:
private Runnable getTask() {
    boolean timedOut = false; // Did the last poll() time out?

    for (;;) {
        try {
            Runnable r = timed ?
                workQueue.poll(keepAliveTime, TimeUnit.NANOSECONDS) : // 重点
                workQueue.take();
            if (r != null)
                return r;
            timedOut = true;
        } catch (InterruptedException retry) {
            timedOut = false;
        }
    }
}
对于newFixedThreadPool,线程到达corePoolSize以后不会增加也不会减少,对于newCachedThreadPool,在线程空闲的时候,就缩减线程池中线程的数量.这个逻辑看似困难,其实实现非常简单。在getTask函数中,如果是FixedThreadPool,则调用阻塞队列的take获取任务,take获取不到任务时会一直阻塞,如果是CachedThreadPool,则调用阻塞队列的poll方法获取任务,如果超时,则返回null,runWorker获取到null以后,就自动退出.这样简单的逻辑,就实现了线程池中线程的收缩逻辑.
5. 总结
本文首先介绍了ExecuteService的使用,然后给出了java的并发执行框架的类图,最后详细分析了ThreadPoolExecutor的源码,通过本文,读者应该能够了解java的并发执行框架的大致结构以及线程池的实现,并且知道如何轻松的增加和缩减线程池中线程的数量.